You can create new cases from within a contact’s individual record OR from the toolbar in the Services module. You can also create a new case by converting correspondence in the Mail module to casework.
Create a new casework request...
Creating a New Case from within the Contact’s Record
Start by searching for the contact using the Quick Search in the upper right corner. If the contact already has casework, you will see a small orange badge below the contact indicating the number of cases the contact has had with the office. If a contact already has an open case for this issue, you can update it rather than creating a new one.

If you need to create a new case, you can select the contact from the list. (If you do not see the contact listed, click Create New Contact. After filling out the new contact’s information, follow the same instructions as below.)
- Within the Contact’s record, click the blue New button that appears on the right.

- Select Casework from the list, the New Case dialog opens.
- Enter or search for the case Tags (type of case).
- Select to whom the new case will be Assigned.
- Status defaults to Active. All new cases are considered active/open.
- Select Office name where the case will be worked (optional).
- Enter brief Description of the case.
- The case Due Date will auto populate but can be changed.
- Received On and Received By will automatically populate when new case is saved.
- Click Save button.
- The new case will appear at the top of the contact’s Overview. Keep in mind that you are still in the contact’s record and not yet in the case. Click on the Case ID number to begin working on the case.

Creating a New Case Using the Services Toolbar
You can also create new casework using the New button on the toolbar. Select Services from the top navigation menu, and then select the New button from the toolbar.
- The New Case form will display in the center of your screen. Start by selecting a case Tag. Begin typing the case tag to see a list of options appear. Select the correct one.
- The assigned staff is the person who will be handling the case. If you do not select a user ID, the case will automatically be assigned to you and display in your My Cases folder. To send it to someone else’s My Cases folder, select the correct name from the dropdown.
- Type in a comment or short description of the issue in the Description field.
- At the bottom of the form, you will see the options to create a new contact, a new organization, or to find a contact or organization. To search for the contact, select Find Contact or Organization. You will then be able to search using a variety of criteria. Once you find the contact, then select the contact, and click Apply. If the contact was not listed, close the search window, and click New Contact. The contact’s name will now appear at the top of the form.
- After completing the new case form with all of the desired information, click Save. The new case will be listed with your other casework in the My Cases folder.
Converting a Correspondence Activity to a Case
If you have a correspondence activity that should become a case, you are able to convert the activity to a case, which will save the original incoming message as a case activity and create a case record for the contact.
- Select the incoming message.
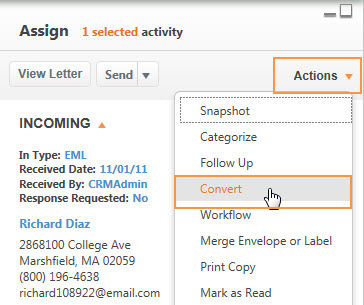
- In the top right of the Assign Panel, select the Actions dropdown, and choose Convert.

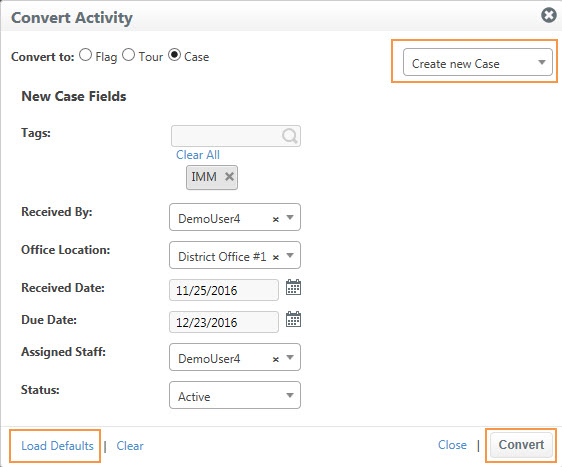
- A Convert to Case form will appear so you can assign values to the new case. Label the case with a case type, assigned staff member, and any other desired information. (If you have defaults set for new casework in your user settings, click the Load Defaults link at the bottom of the form to populate them automatically.) Then click Convert. The new case will be listed in the assigned staff member’s My Cases folder where he/she can add a comment, view the incoming email, and move forward with the case.

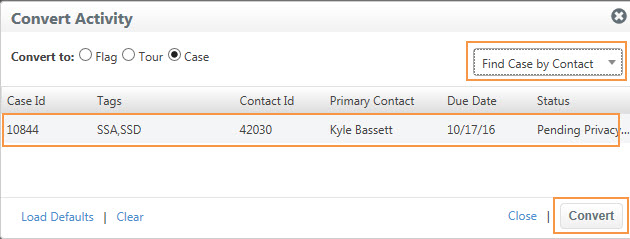
- If the contact has an open case already, you will see the case listed, and the "Convert Activity" option will default to "Find Case by Contact." Selected the case, then click Convert.

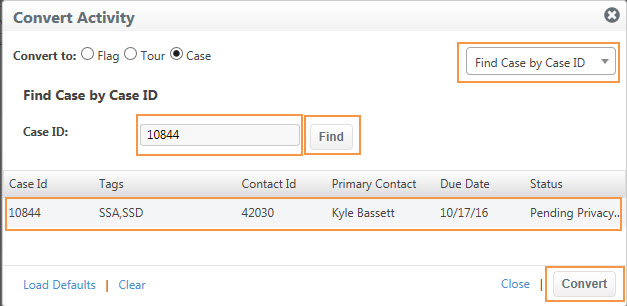
- If the correspondence activity should be associated to an existing case that does not appear in the "Convert Activity" dialog, it is most likely because the correspondence is from a contact that is not associated with that case yet. You can still associate the correspondence to the case by selecting "Find Case by Case ID" from the "Convert Activity" options dropdown men. Type in the appropriate Case ID number, and click Find. Verify that the correct case displays, select the case, and then click Convert.

Comments
0 comments
Please sign in to leave a comment.