If you plan to export lists, send a mass mailing, import a list into the eNewsletter Gateway, or print labels for a large number of contacts, you will need to start by creating a saved search in the Contacts module.
1. Select Contacts from the top navigation menu.
![]()
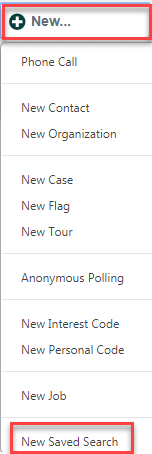
2. Create a saved search by clicking the New button on the upper left, and selecting New Saved Search.

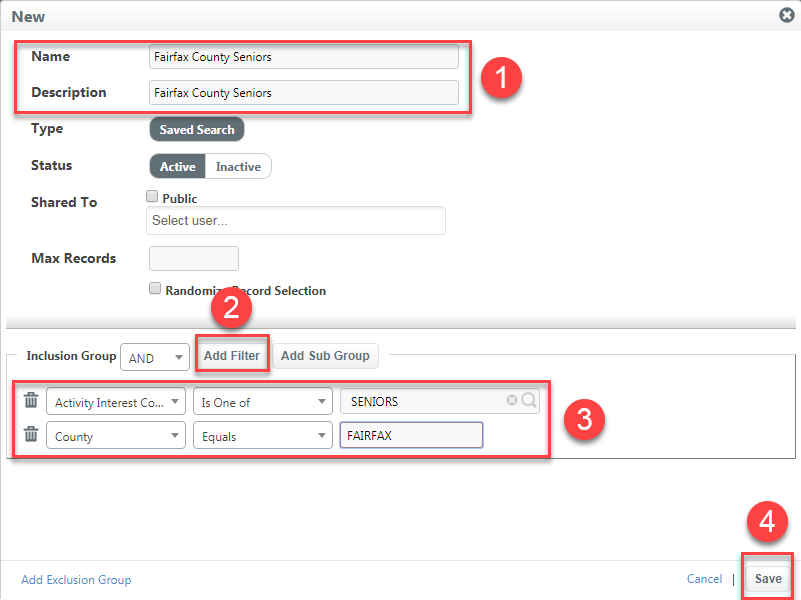
3. The New Saved Search dialog opens.
4. Give the saved search a Name and a Description.
5. You have the option of making the search Public, which will display the saved search for all staff, or to share it to a Select User(s) by selecting their staff ID from the drop-down.
6. FOR 499 lists during Blackout periods (U.S. House Only). You also have the option to Randomize Record Selection results for the saved search and limiting the Max Record number for 499s.
7. You are now ready to set up your criteria:
- Start by clicking the Add Filter button located to the right of Inclusion Group.
- Select the correct criteria, choose an operator, and type in or select your keyword.
- Add additional inclusion filters or sub groups as necessary.
- To exclude, click the Add Exclusion Group button as necessary.
NOTE: Building Saved Searches is just like Algebra in high school - start simple then add on more complex filters, remember your ANDs and ORs, and don't forget sub groups are separate queries within the main query.

8. Then click Save. Your new saved search will be listed in the left navigation panel.
9. Click the name of the search to see the list of contacts.
10. You can go through the saved search results and individually select constituents, or you can click Select All to select all contacts on this page (up to 100 contacts). If your results total to more than 100 contacts, you’ll then be given an option to Select all [5,000] Contacts.

Depending upon your goal for the list, there are several common filters you may want to include:
- If you plan to export the list or transfer to the Gateway, we highly recommend removing any constituents who have been flagged as restricted. Add the filter "Restricted" = "No".

- If you plan to send out a hard copy mailing to the list, you may only want to send to one member of the household. Add a new group, set the condition to "Any of(OR)". Change the first filter to "Head of Household?" = "Yes." Add a second filter "Householded?" = "No." This will ensure that if contacts are householded together, only the head of the household will appear in your list, and if contacts have not been householded, they also appear in your list.

Comments
0 comments
Please sign in to leave a comment.