Mass mailing is a function that allows you to pull lists of contacts and send them all a letter. Several important options assist with mass mailing such as the ability to specify the number of contacts or to only send to heads of household.
You'll need two things to begin:
Once the form letter and saved search have been created, you can select your saved search from the list on the left. You can individually select constituents, or you can click Select All to select all contacts on this page (up to 100 contacts). If your results total to more than 100 contacts, you’ll then be given an option to Select all [5,000] Contacts.

Setting up a Mass Mailing
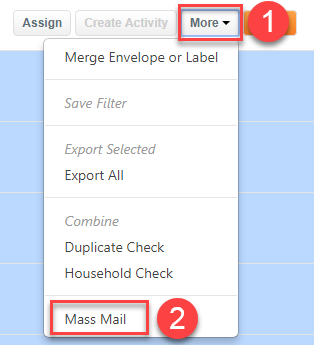
To begin setting up a mass mailing, click the More button on the upper right to see more options, and then select Mass Mail.

A Mass Mail dialog opens, complete the form.

- For hard copy correspondence, select Letter as the mailing type. For email correspondence, select Email.
- Give your mailing a name. (This will be the name of the print job.)
- Check the desired options. You can choose to send to only a certain number of random contacts, to send to heads of households only, and to create a saved search of your mailing results.
- Depending upon your selected mailing type, you will see either “Letter Options” or “Email Options” below. With letter options, select the printer, envelope, or labels. With email options, select the template and add attachments. (New attachments can be added by clicking on the New button in the upper left and selecting Attachments.)
- Next, you will set up the activity. You may not need to complete every field, but you will need to select a form letter. The letter you plan to use should first be added to Letters with the usage set to “Correspondence.” Click Add Letter to type in the letter name if you already know it, or click Search for Letter to search your list of form letters by code or description.
NOTE: If you plan to eliminate these contacts from future mass mailings, it is a good idea to give the activities an agreed upon “Mass Mailing Recipient” interest code or group code so you can filter these contacts out of a future saved search. - Below “Letter,” there is a checkbox that reads “Ignore Previously Received Letter Check.” When creating a mass mailing, any constituents who have received the form letter in the past will automatically be removed from the final mailing. If you want the constituents to possibly receive this letter again, then check this box.

- Before merging or printing, you should run a QA check to see what your final mailing results will be. Click QA Check on the bottom left corner of the form. You will see how many were originally selected, how many heads of households, how many restricted constituents and additional information. You will also see a final total of mass mailing activities that will be created.
Create and Merge or Create and Send Your Mass Mailing
When your form is complete, select either Create and Merge or Create and Send. Create and merge will create the job and the activities, merge the documents, and wait in Jobs for you to review and send. Create and send will create the job and activities, merge the documents, and either print or email with no opportunity to review the documents.
NOTE: If your office does not have server side printing, Create and Send will only work for email. You will need to use Create and Merge for hard copy correspondence and then print mailing activities from within the print job.
Reviewing Merged Documents and Sending
If you selected Create and Merge, you can review your documents before printing or emailing.
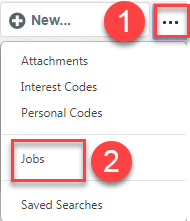
1. Above the left navigation panel and next to the New button, there is a … icon that will give you access to all folders. Click the icon, and select Jobs.

2. All jobs will be listed here. Find your mass mailing job. Once the status reads, “Merge completed,” click the name of the job to open it.

3. You can view the activities, click the Letter icon to view the Word document, and for email jobs, click the Email icon to view the outgoing email.
4. If there are any that need adjusting or correcting, select them and click Reopen. They will be moved into the assigned staff member’s My Mail folder.
5. If all are ready to go, select all and click Print for hard copy correspondence if your office does not have server-side printing. (Note that the status of the job will remain “Merge Completed.”)

6. For any other correspondence, return to the list of jobs by closing the job details window using the X in the upper right corner. Select the row, and click Start Job.
NOTE: For more information about print jobs, see the Quick Tip Printing or Emailing Large Groups of Correspondence.
Comments
0 comments
Please sign in to leave a comment.