The Letters module is where you’ll view create, and edit form letters. Letters allows your office to create versions of each letter for enhanced collaboration and also requires that only one staff member at a time have the ability to edit a letter to avoid any over-writing of work.
NOTE: Form letters can be used to respond to multiple constituents. For information about writing a unique letter to an individual, see the article How do I write a letter for one contact?
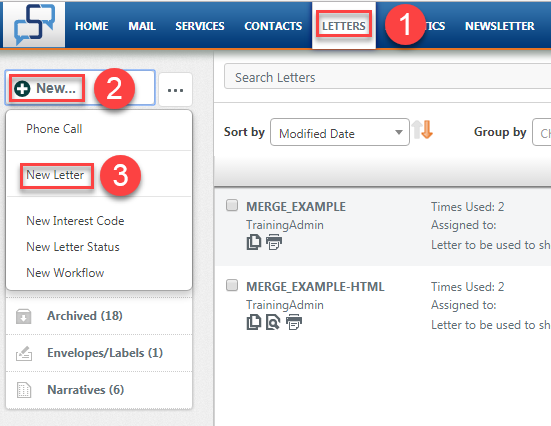
Start by selecting Letters from the top navigation menu. Click the New button above the left navigation panel and select New Letter from the drop-down. (You can also copy an existing letter by first selecting the row and then clicking the Copy icon.)

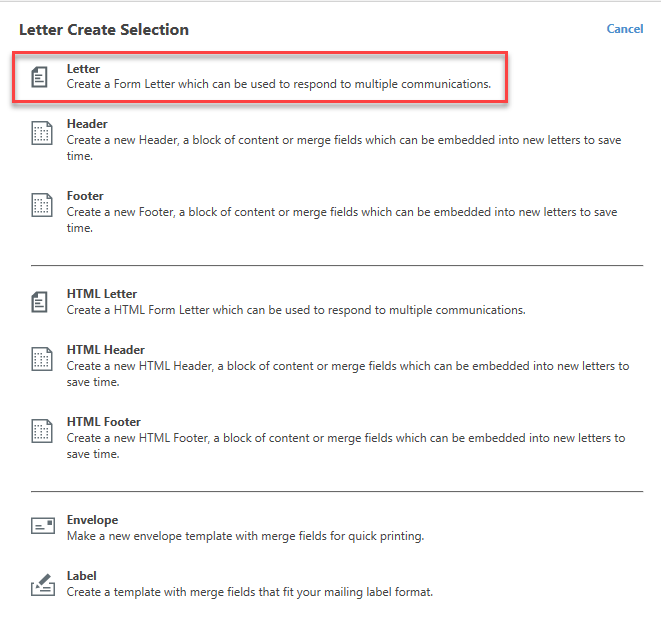
The Letter Create Selection wizard opens in the right panel and walk you through the process of setting up the new form letter.

- Click Letter.
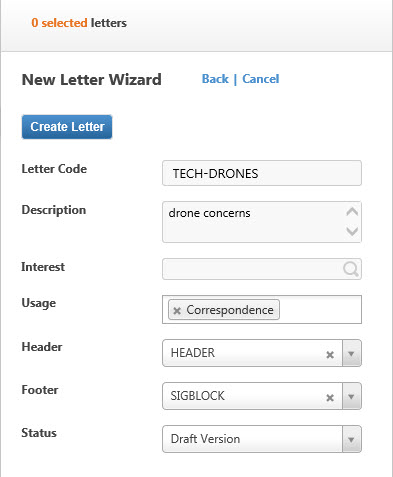
- From the New Letter Wizard, click in the Letter Code field and enter your letters name.
- In the Description field enter a detailed description of your letter.
- You can apply an optional Interest Code.
- You may also apply an optional Sentiment (None, Pro, Con, Undecided).
- Set usage to Correspondence/Mail.
- Select the appropriate Header and Sigblock.
- Click the Create Letter button.

9. The letter details screen will open prompting you to edit your letter. Click the Edit Letter button at the top of the panel.

10. Microsoft Word will open, where you can begin editing your letter. When you’re through, close Word using the X in the top right of your screen, and click Yes to save your changes.
NOTE: We recommend that you type the letter directly into the Word document rather than copying and pasting to avoid formatting errors. If you must copy and paste, paste into Notepad first to strip the text of any formatting.
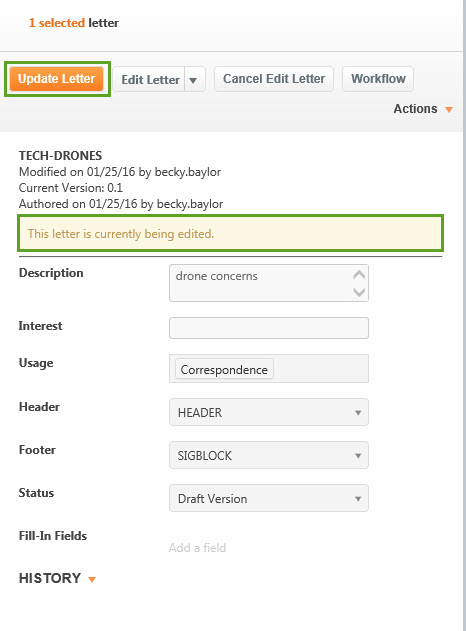
11. When you return to the letter details screen, the prompt will now read, “This letter is currently being edited.” You will also see an orange Update Letter button now displaying at the top of the panel. If you are through editing your document, you will need to click this button to publish the version of the letter you edited and make it available to other staff members who may need to edit or approve this form letter.
NOTE: You will also see a Cancel Edit Letter button. This will cancel any edits to a letter and restore it to its previous version so that the letter can now be edited by any staff member.
12. After the letter is checked in, the prompt will read “This letter is currently a draft. Change it to a final status to use.” As long as the letter is a draft, it cannot go out to contacts. If you are ready to begin sending the form letter to contacts, click the dropdown menu next to the “Status” field, and select Final Version. The prompt will now read, “This letter is currently final and can be used in an activity.”
13, If the letter needs to be approved by other staff members, leave the status set to draft. As long as the letter has been updated, then anyone who needs to edit or approve the letter can make changes to the document. If your office uses workflow, click the Workflow button, select the correct workflow definition, and click Initiate.
14. Click Save Changes.
Comments
0 comments
Please sign in to leave a comment.