The standard Inbox/Mail view is a simplified view of the mail that displays the received date, the contact's name, and a bit of the message. This is a great view for those who work with mail but whose primary role doesn't involve sorting mail. If you'd like to customize your view so that it displays additional information, you can access the Viewer Settings by clicking the Gear icon that appears to the right of the page display.

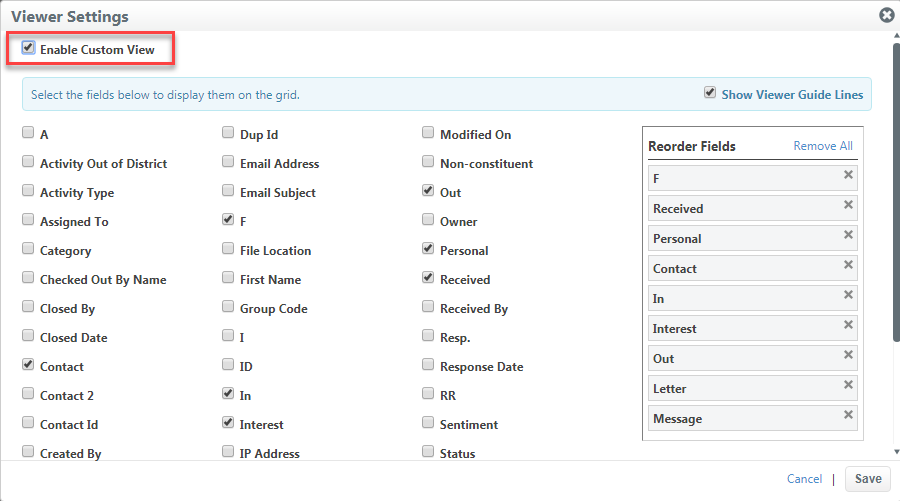
Viewer Settings allows you to enable or disable the custom view, select the fields you'd like to appear in your custom view, add viewer grid lines, and reorder your fields. To enable Custom View follow the below steps.
- Start by checking the "Enable Custom View" check box that appears at the top of the Viewer Settings dialog.

- The majority of the screen displays all the possible fields that can be included. Check the ones you'd like to see in your view.
- The fields you select will now appear in the "Reorder Fields" panel on the right. You can reorder them by dragging and dropping them into the desired order.
- Lastly, you have a check box above the "Reorder Fields" panel to Show Viewer Grid Lines. This will add in lines between the fields in your viewer so your view will look similar to a spreadsheet.
- After changing your Viewer Settings, click Save so your customizations will be saved so every time you login, you will see your new layout.
- If you decide to revert back to the standard view, you can follow the same process only uncheck "Enable Custom View" in the Viewer Settings dialog.
You can also use the Sort By and the Group By drop-downs to further customize your layout.
- Click the Sort By drop-down to select the field name to sort.
- Use the orange Arrow icon to reverse your sort.
- Click the Group By drop-down to select the field name to group.
- Your customizations will be saved so every time you login, you will see your new layout

Comments
0 comments
Please sign in to leave a comment.